
I realized that I am constantly correcting things. If a picture frame is tilted, I straighten it. If my children are picking their noses, I tell them to use a tissue (gross, I know). My husband goes to Starbucks and doesn’t bring me back an Iced Cinnamon Almond Macchiato? He dies.
Ok, I won’t kill him. But he will endure intense passive aggressiveness for at least a week.
Interestingly enough, the only thing I am not correcting is my face. As in color correcting, that is. I have always been intimidated by the whole process. Adding green, yellow or orange to my face seemed really counterintuitive, not to mention intimidating. I mean, isn’t the whole purpose of makeup to make the skin look more like your skin, only better? So how does adding non-skin like colors, make it more natural? And what if you add too much or don’t blend it out? You are basically going to be walking around like a clown college reject.
Stuff like this keeps me up at night.
Well, to ease my concerns and help with my sleep routine, the nice folks at Hard Candy sent me a trio of Sheer Envy Color Correct Cushion Wonders. These beauties come in a squeeze tube with a cushion tip that you twist to open and close. It doesn’t take a lot of pressure to get the product to come through, so my suggestion is to just squeeze a bit. A little goes a long way.
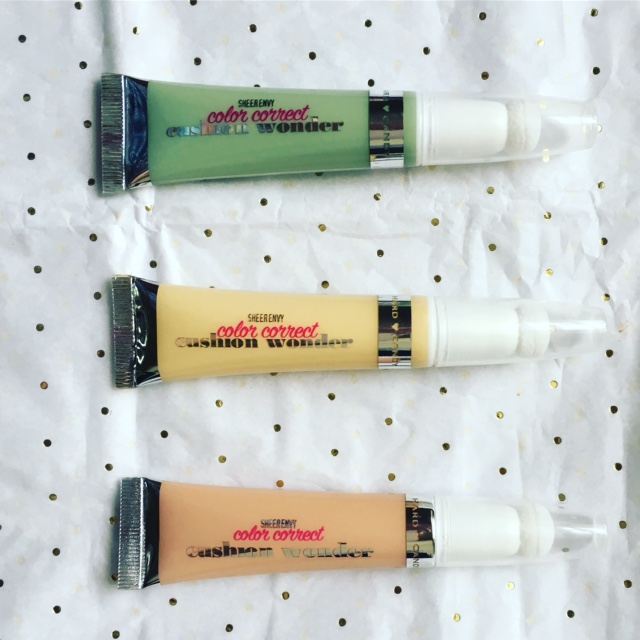
You can find these products at Walmart and they cost $6 each. Now that seems like a deal if you ask me, but, let’s test these babies out first, shall we?
Not coincidently, today I woke up with the usual dark circles under my eyes (see what keeps me up at night above), redness and discoloration on my cheeks, nose and forehead and, of course, a zit right on the bridge of my nose.
First I tackle the under eyes and use the peach to soften the darkness a bit. The formula seemed lightweight and went on smooth. When I rubbed it between my fingers, it felt a bit mousse like. It also had a very faint sweet floral scent, which I really liked. I moved on to yellow and apply a bit on my eyelids to cover the bluish veins and on my forehead and chin to add a little brightness. Since it is a squeezy tube, why not freehand a cute little design? No one said you can’t have fun neutralizing redness.


To conquer the zit, I hit up the green one. Out of all the colors, this is the one that freaks me out the most. I can deal with peach and yellow, but GREEN? The Hulk is green. Kermit is green. Me? I’m pasty white with freckles. But it’s ok, this will work. I apply a small (size of sun) dot on the zit and on the side of my nose and begin blending the products with my beauty sponge.
I start off with the peach and yellow and find that they blend out surprisingly easy. Then I tackle the Hulk colored areas. Once again, I find that the color sinks into the skin really well and immediately, the zit looks less red. By George.. I think we found something!
But before we get all excited, we haven’t passed the final stage. Blending your foundation and concealer on top of the Impressionist painting currently hanging on your face. So I grab by trusty Covergirl Vitalist and my Tarte Shape Tape and finish prepping my face. When I look in the mirror and check out my handy work, I am totally impressed. My under eyes look brighter. Same for my forehead and chin. However, what I am most impressed by is the zit on the nose. Right off the bat, you could barely tell it was there if not for the bump. Yet, that’s not all, my friends. Three hours later when I do a quick check in, it still looks good. This is literally one of the oiliest parts of my face. Products usually breaks up first around my nose area and I still could not pick up on any redness.

Boom! Mind is blown.
I have no idea why I was so worried. I guess, as with everything, the product you are using is key, so if you are like I once was and are a bit hesitant to venture into the scary world of color correcting, stop by your local Walmart and pick up one of these Hard Candy beauties. I guarantee you that you will not be disappointed as they have made it practically goof proof.
Till next time, my friends!
Maritza

You look great! Color correcting can be a bit scary for a novice like me, but after seeing your results, I think I am going to give it shot. Thanks!
LikeLiked by 1 person